
1. Required Hardware
Raspberry Pi 2 or above
SD Card (32 Gigabyte or above)
SDR USB Dongle
Antenna 868Mhz (6dBi or above)
Antenna Cable
Power supply 5V
Case with Cooling Fan
2. Install Software on Raspberry Pi
Download the Raspberry Image with following link:
http://pilotaware.lode.co.uk/downloads/OGN/PilotAware-OGN.latest.zip
(if it is not downloading after you ckicked on the link, please right click on the link and click examine. Than a window should pop up showing the link in the html code. Click on that link)
We are going to install the PilotAware Software which lets us create a ATOM Station which is then going to Feed the received FLARM Data into the OGN (Open Glider Network).
Once you have downloaded the Raspberry Image, you going to need a Software to flash the SD Card. I Recommend using the software Win32DiskImager.
- Open Win32DiskImager and select the Image you just downloaded by clicking on the blue folder Icon.
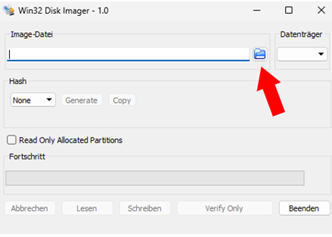
- Than Select your SD Card you want the image to be flashed on in the Dropdown menu on the top right corner.

- Next click on “Write” and let the software finish its job.
- Plug the SD card back in the Raspberry Pi.
3. Connect the SDR USB
After you successfully flashed the software on the SD Card you can now look at the SDR dongle. There are many kind of SDR (Software Defined Radio) USBs out there.
Most Popular SDR USB Dongles:
- HackRF SDR
- NooElec SDR
- RTL-SDR.com Dongle
(Don´t cheap out on the choice)
I recommend the NooElec SDR USB V5 and this is also the Dongle I will be using in this Project. After choosing a Dongle you have to connect it to the Pi.
The PilotAware ATOM station is capable of Receiving Flarm Frequencies (868Mhz) and Transponder Frequencies (1090Mhz).
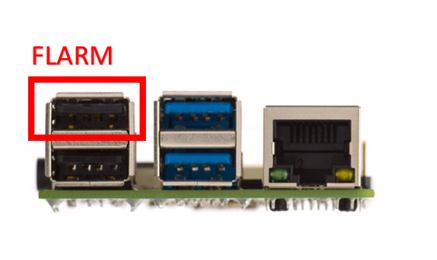
For Flarm Reciption you have to Plug the SDR USB into the Top Left USB port of the Pi (as we will do it in this project).
4. Connect the antenna
For Flarm reciption you need a 868Mhz antenna. I would recommend not only to look at the dBi of the antenna but on the lrnght of it. Cheap antennas often lie about the dBi. A decent 868Mhz antenna should be around 1 meter long.
I can recommend antennas from https://vinnant.sk/ . They custom build high quality antennas for a very reasonable price (if you live in europe). They also sell cables to connect the antenna to the SDR USB.
I went with following antenna:
It is a 8dBi 868Mhz optimized for FLARM and Lora

You also have to find a suitable cable to connect the antenna to the SDR USB. The connector on the SDR USB is called SMA connector (just to make it easier to find a cable).
5. Booting up the Raspberry
After you have connected the SDR USB to the Pi, connected the antenna to the SDR USB and Also connect the Pi to the Internet via a ETHERNET Cable, we can now boot up the Pi.
Therefore you´ll need a 5V power source to power the Pi via a Micro USB (newer Pis use USB Type-C) cable.
6. Connect to the Raspberry Pi
To connect to the Pi you need to find it´s IP address. To find it you can use a IP Scanner.
I recommend using a Software called “Angry IP Scanner”. You can download it here: https://angryip.org/.
When you run the program you should find a a column in the register called “ognpaw”.
Now open your Browser and type in the IP address you just determined followed by the port 4200.
It should look something like this:
192.168.0.265:4200
After pressing enter you should be greeted with a screen which asks you to log in.
The standard log in credentials are:
- Username: pi
- Password: 12345678

Enter login as: pi
And than it will ask you to enter the password. Enter the password (it wont show up on screen) and than press enter.
7. Setting up the ATOM station Software
After logging in you should be in following menu:
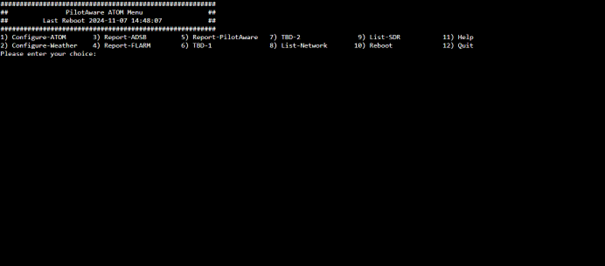
To configure the ATOM station type “1” in the field below and press enter.
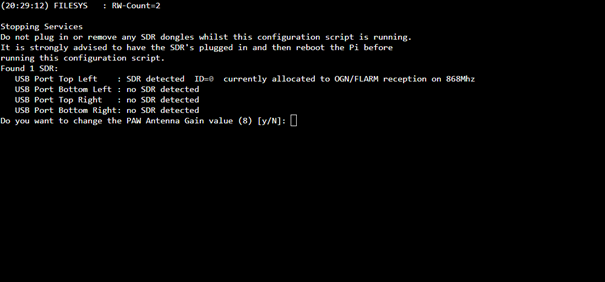
You should see the SDR USB show up in Port Top Left.
After that you have to enter a few details to configure the station.
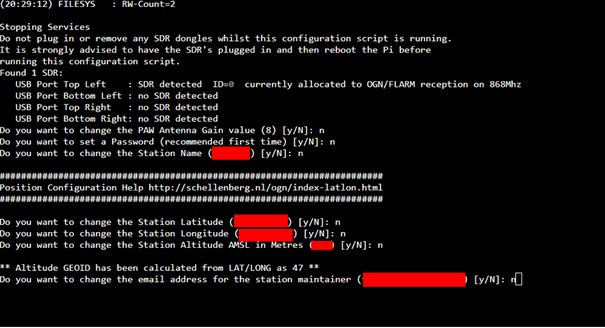
Complete Following Steps
- Enter your antenna Gain value (in my case 8)
- If you want to set a new password you can do it in this step
- Enter your stations name
- Enter the stations Latitude
- Enter the stations Longtitude
- Enter the stations Altitude
- Enter your E-Mail address
After completing all steps the software is going to test the antenna to determine the Gain needed. It is going to pick up frequencies around to do this.
After that the station is set up and ready for use und should how up on websites like glidertracker.org.
8. Antenna placement
For the best FLARM reception you should place your antenna high up with no obstacles around. The FLARM signals are relatively weak and therefore this step is pretty important.
9. Ways to connect to Raspberry
After you have successfully set up the station there are a lot of information you can see from your ATOM station.
To access them you only need to change the port on the IP you entered in your browser
For example:
- YourIP:8000 to see which planes the Grid is picking up
- YourIP:8080 to see reception information
- YourIP:8081 also to see reception information
You should also have received and E-Mail which contains login credentials to access the ATOM station from outside of your network.